The Title Manager plugin allows you the ability to customize the text that appears in the browser's title bar to meet your needs.
By default, the page title for your Soapbox site displays the title of the page the end user is currently viewing:

The Title Manager allows you to insert additional text in front of or after page titles across your site. An example of how this could come in handy would be in inserting your organization's name and tagline alongside the page title, as shown here:

Additionally, the Title Manager allows you to display only this customized text in the page title of your home page, excluding the page title, as shown here:

Customizing the home page title in this way allows you to determine the text that is displayed for your site's link in search results with services such as Google:

To customize page titles using the Title Manager:
- Go to Extensions > Plugin Manager
- Open System - Title Manager
- In the right column under Parameters > Plugin Parameters, enter the customized text you wish to use in the Alternative Site Name (Optional) field. For the example above, we entered Non-Profit Soapbox | Affordable, powerful websites for Non Profit Organizations.
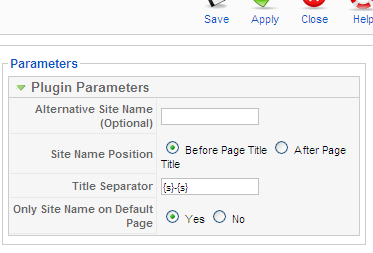
- For Site Name Position, select whether you would like the Site Name to appear before or after the page title. For the example above, we chose After Page Title.
- For Title Separator, enter the character you wish to use to separate the page title and the Alternate Site Name. The default is a dash. Another commonly used option, as we've used in the example above, is a pipe, or |, character, though you can choose any set of characters you wish.
- Be sure to use {s} before and after the separator to designate the number of spaces you wish to appear.
- For Only Site Name on Default Page, choose Yes or No. In the example above, we chose Yes.
- In the left column, ensure that Enabled is set to Yes
- Click Save
- Go to the front end of your site to confirm that the change has been made. NOTE: It may take several days to a few weeks for search engines, such as Google, to note and display the change in their results.