If your site has the Soapbox CMS (Does my site have the Soapbox CMS?), with Directories you have the ability to associate Salesforce records with articles in the content management system and display those articles on the Directories Record Detail view. Those records are displayed using the Related Salesforce Records module after you have done the initial setup required for associating Salesforce records with articles.
Adding a Module
To add a Related Salesforce Records module to your site:
- Go to Extensions > Module Manager
- Click New in the upper right
- Click Related Salesforce Records
- For Title in the Module [Edit] view, enter a title for the module
- For Show Title, select No or Yes to hide or show the title to the end user
- For Enabled, select No or Yes to hide or show the module on the front end of your site
- For Position, select the position in which you wish the module to appear. To review your site's module positions, read Module Manager: View module positions on your site.
- For Order, select the order in which you wish this module to appear, relative to the other modules set to the same module position
- For Access Level, choose Public, Registered, or Special, depending on which type of end user you wish to view the module. If your site does not restrict access to content by requiring individuals to login or you wish all end users to view this module, leave this as Public.
- Under Menu Assignment, select which menu items on which you wish the module to appear. To display the module on all pages, leave this as All. If you wish to choose to display it on specific pages only, choose Select Menu Item(s) from the List and select the appropriate menu items. For further instructions on this process, read Module Manager: Publish a module to a given page.
- In the right column under Parameters > Module Parameters, for Keywords Field, enter the name of the field in Salesforce containing the keywords used to match the values contained in the Articles.
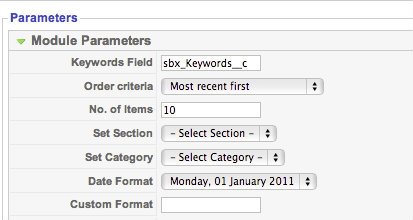
- For Order Criteria, choose the order in which you wish matching Articles to be displayed
- For No. of Items, enter the maximum number of matching number of articles you wish to display
- For Set Section, choose a specific Section, if you wish to display only articles from a given Section. If you wish to show articles regardless of their Section, leave this as "- Select Section -".
- For Set Category, choose a specific Category, if you wish to display only articles from a given Category. If you wish to show articles regardless of their Section, leave this as "- Select Category -".
- For Date Format, choose a format in which to display the Created Date of the article, if you choose to display it
- If you wish to use a date format not listed in the Date Format drop down, enter a desired format into the Custom Format field following PHP strftime standards. Common examples of date-only formats include:
- %B %e, %G (e.g., July 6, 2011)
- %m-%d-%g (e.g., 07-06-11)
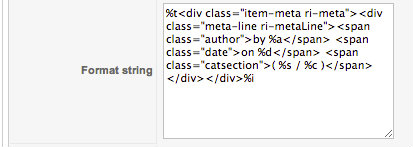
- For Format String, edit the format in which you wish the articles to be displayed. Basic HTML can be included in this formatting along with the following variables for displaying elements from the article:
- %t: Article Title
- %a: Article Author
- %d: Created Date of article
- %s: Section of the Article
- %c: Category of the Article
- %i: Intro text of the Article
- For Link Title, choose whether or not you wish to link the article title to the full article view
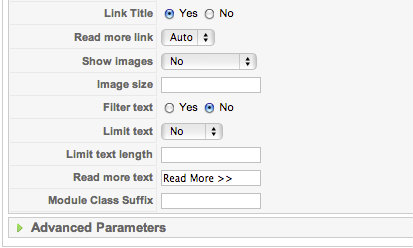
- For Read More Link, choose No to not display a read more link to the full article view, Yes to always display a read more link, or Auto to display a read more link only if there is additional content to display.
- For Show Images, choose one of the following for how images included in the article introduction are treated by the module:
- No: Images are not displayed in the module
- As is: Images are displayed in the module with no alteration of their size
- Width scaled: Images are displayed in the module but resized so their width matches the number of pixels identified in the Image Size field and their height proportional to that width
- Height scaled: Images are displayed in the module but resized so their height matches the number of pixels identified in the Image Size field and their width proportional to that width
- For Image Size, if you have chosen Height Scaled or Width Scaled for Show Images, enter the number of pixels to which to scale the image
- For Filter Text, choose whether or not you wish to remove HTML from the intro text so elements such as hyperlinks do not appear
- For Limit Text, if you wish to limit the amount of the intro text shown in the module, choose Words, if you wish to define the maximum number of words to display, or choose, Chars, if you wish to define the maximum number of characters to display. If you do not wish to limit the amount of text, choose No.
- For Limit Text Length, if you have chosen to Words or Chars for the Limit Text field, enter the maximum number of words or characters you wish to display from the article intro text
- For Read More Text, enter the text you wish to display as the read more link
- For Module Class Suffix, leave this blank unless directed by your Project Manager
Editing the Module
To edit this module on your site:
- Go to Extensions > Module Manager
- Locate the module in the list of options
- Click the title
- Edit the parameters as described above
- Click Save
Deleting a Module
To delete a module on your site:
- Go to Extensions > Module Manager
- Locate the module in the list of options
- Click the check box next to the title
- Click Delete in the upper right