When someone makes a donation with the Donations app, they can also choose to sign up for your organization’s newsletter. With the help of the Soapbox Salesforce integration features, this information is sent to your Salesforce account, where a Lead is created. The Soapbox Donations for Salesforce managed packages installed on your Salesforce account then evaluate that Lead in an attempt to find a match with an existing Contact.
If no Contact currently exists, then a new Contact will be created, complete with the data from the Soapbox Donations form, including the newsletter sign up. However, in order for an existing Contact record to be updated, some workflows need to be created in Salesforce (for a more detailed explanation on why this happens, see our previous blog post).
This tutorial will walk you through creating the custom Lead and Contact fields and establishing the workflow rules in Salesforce to ensure that both new and existing Contacts are properly signed up for your organization’s newsletters.
Please note that this process includes creating new Lead and Contacts fields that will allow you to collect additional data beyond contact information: 1) the date and time of the sign up; and 2) the IP address of the individual who signed up. Doing so gives you documentation that demonstrates that these individuals knowingly and willingly chose to sign up for your newsletter.
First stop: Soapbox
Enable newsletter opt-in checkbox on your Soapbox Donations form. See our previous knowledge base article for a how-to.
Next Stop: Salesforce
- Log into your Salesforce account
- Click on your organization’s name in the top right of the screen and in the drop-down menu, select “Setup”
Create the custom Lead fields
In the side menu on the left of the screen, under “App Setup” go to: Customize -> Leads -> Fields
Go to the subsection "Lead Custom Fields & Relationships" and click the "New" button
Create "Donation Newsletter Opt In" field
STEP 1: Choose the field type - select “Checkbox” and click Next
STEP 2: Enter the details.
- Field Label: Donation Newsletter Opt In
- Field Name: sbx_DonationNewsletterOptIn
- Default Value: Unchecked
- Leave the rest blank, and select Next
STEP 3 & 4: leave as-is and click Save
Create "Email List" field
STEP 1: Choose the field type - select “Checkbox” and click Next
STEP 2: Enter the details.
- Field Label: Email List
- Field Name: sbx_EmailList_General
- Default Value: Unchecked
- Leave the rest blank, and select Next
STEP 3 & 4: leave as-is and click Save
Create "Email List IP Address" field
STEP 1: Choose the field type - select “Text” and click Next
STEP 2: Enter the details.
- Field Label: Email List IP Address
- Field Name: sbx_EmailList_IP_General
- Length: 255
- Leave the rest blank, and select Next
STEP 3 & 4: leave as-is and click Save
Create "Email List Timestamp" field
STEP 1: Choose the field type - select “Date/Time” and click Next
STEP 2: Enter the details.
- Field Label: Email List Timestamp
- Field Name: sbx_EmailList_TS_General
- Leave the rest blank, and select Next
STEP 3 & 4: leave as-is and click Save
Create "IP Address" field
STEP 1: Choose the field type - select “Text” and click Next
STEP 2: Enter the details.
- Field Label: IP Address
- Field Name: sbx_IpAddress
- Length: 255
- Description: The IP address of the Soapbox visitor
- Help Text: The IP address of the Soapbox visitor
- Leave the rest blank, and select Next
STEP 3 & 4: leave as-is and click Save
Create custom Contact fields
In the side menu on the left of the screen, under “App Setup” go to: Customize -> Contacts -> Fields
Repeat the steps outlined above for the custom Lead fields to create corresponding custom Contact fields. You only need to do this for the Email List, Email List IP Address, and Email List Timestamp fields.
*Note the following change: when creating the Email List custom Contact field, add “Contact sign up to receive email communications” to the Description and Help Text fields.
Map the newly created custom Lead fields to their counterparts in the Contact objects
- In the Lead Fields section (App Setup -> Customize -> Leads -> Fields), click the “Map Lead Fields” button in the Lead Custom Fields and Relationships subsection.
- Email List IP Address: Contact. Email List IP Address
- Email List Timestamp: Contact. Email List Timestamp
Create the workflow rule in Salesforce that will push the date and time and the IP Address fields from the converted Lead to the Contact object
In the side menu, under “App Setup” go to: Create -> Workflow & Approvals -> Workflow Rules, Click “New Rule”
STEP 1: Select object -- choose “Lead” from the drop-down list
STEP 2: Configure Workflow Rule. Enter the following information (see screenshot for further assistance):
- Rule Name: “SBX: Check if Email List of Donation Opt In is TRUE”
- Description: leave blank
- Evaluation Criteria: select last option, “created, and any time it’s edited to subsequently meet criteria”
- Rule Criteria: after “Run this rule if the following”, select “criteria are met” from the drop-down menu. Then enter the following criteria:
- Field: “Lead: Email List”; Operator: “equals”; Value: “True”
- Field: “Lead: Donation Newsletter Opt In”; Operator: “equals”; Value: “True”
- Select “Add Filter Logic” = Type in “1 OR 2” in this field (no quotes)
- Click “Save & Next”
STEP 3: Click “Done”
Create the corresponding “field updates” and add them to the new workflow
These field updates will be carrying out the actions specified in the newly created workflow.
In the side menu in Salesforce, go to: App Setup->Create -> Workflow & Approvals -> Field Updates and click “New Field Update”
New field update
- Name: SBX: Update Email List
- Description: Update Email List field to TRUE
- Object: Lead
- Field to Update: Email List
- Re-evaluate Workflow Rules after Field Change: leave UNCHECKED
- Specify New Field Value -> Checkbox Options: “True”
- Click “Save & New”
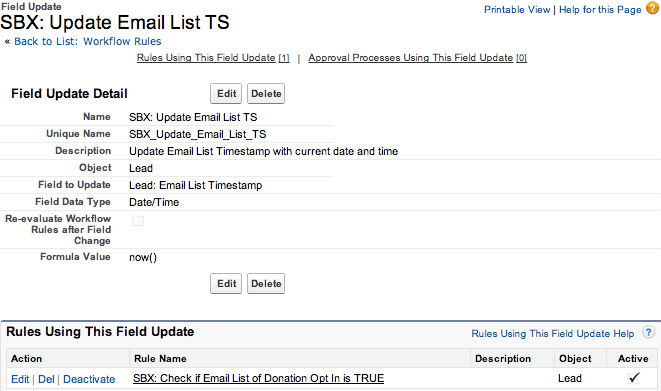
New field update
- Name: SBX: Update Email List TS
- Description: Update Email List Timestamp with current date and time
- Object: Lead
- Field to Update: Email List Timestamp
- Re-evaluate Workflow Rules after Field Change: leave UNCHECKED
- Specify New Field Value -> Date Options: select “Use a formula to set the new value” and in the field, type “now()” (no quotes)
- Click “Save & New”
New field update
- Name: SBX: Update Email List IP
- Description: Update Email List IP Address with value of IP Address field
- Object: Lead
- Field to Update: Email List IP Address
- Re-evaluate Workflow Rules after Field Change: leave UNCHECKED
- Specify New Field Value -> Text Options: select “Use a formula to set the new value” and in the text box, type “sbx_IpAddress__c” (no quotes)
- Click “Save”
Add field updates to workflow
Go to: App Setup->Create -> Workflow & Approvals -> Workflow Rules, select the rule “SBX: Check if Email List of Donation Opt In is TRUE”
- Under “Workflow Actions”, click “Edit”
- Click “Add Workflow Action” and in the drop-down menu, choose “Select Existing Actions”
- In the “Search” drop-down menu at the top, select “Field Update” and add the 3 Field Updates you just created by selecting the Field Update under “Available Actions”, clicking the “Add” button (right arrow).
- Click “Save”
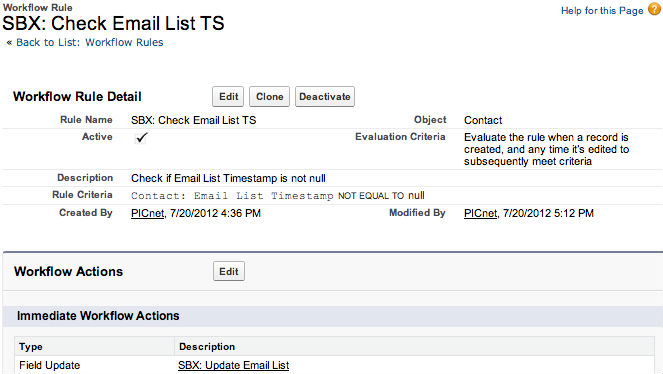
Create the second workflow rule, which will check to see if the new contact has the timestamp of when the contact opted in to the newsletter
In the side menu, under “App Setup” go to: Create -> Workflow & Approvals -> Workflow Rules, Click “New Rule”
STEP 1: Select object -- choose “Contact” from the drop-down list
STEP 2: Configure Workflow Rule. Enter the following information (see screenshot for further assistance):
- Rule Name: SBX: Check Email List TS
- Description: Check if Email List Timestamp is not null
- Evaluation Criteria: select last option, “created, and any time it’s edited to subsequently meet criteria”
- Rule Criteria: after “Run this rule if the following”, select “criteria are met” from the drop-down menu. Then enter the following criteria:
- Field: “Contact: Email List Timestamp”
- Operator: “not equal to”
- Value: leave blank
- Click “Save & Next"
*BEFORE clicking “Done” in STEP 3, click “Add Workflow Action” under “Immediate Workflow Actions” and in the drop-down menu, select “New Field Update” to create the corresponding field update for the second workflow you just made
- Name: “SBX: Update Email List”
- Description: “Update Email List on Contact to be TRUE”
- Object: “Contact”
- Field to Update: “Email List”
- Re-evaluate Workflow Rules after Field Change: leave UNCHECKED
- Specify New Field Value -> Checkbox Options: “True”
- Click “Save”
- This will send you back to edit view for the Workflow rule you created, and all you need to do is click “Done"
